前言
相信各位同学看eos白皮书的权限看得很是头疼,而我能搜索到的例子基本上是官方的那个权限图再结合eos.token进行转账的权限介绍.如果不细心跟着走一遍,你是绝对不好理解这个权限怎么用的.由于我头脑比较笨,着实按照大佬的文章走了三四遍才大约摸索清楚,这里给自己做一个备忘录吧
而我站在大佬的肩膀上,结合实际的操作给大家聊聊这个权限如何使用吧.
这里主要参考的
- EOS 权限管理之-权限的使用 (你绝对找不到的干货)
- EOS开发系列目录 松果的文章都是根据源码分析的,建议开发dapp的同学都认真读几遍吧,这样更能帮助理解eos到底是怎样运行的
准备工作
提前在测试网上申请两个账号,并领取测试币(不知道怎么做的可以翻看我前面的文章),我这里申请了两个.
这次使用cleos操作,就不使用scatter操作了.原理一样.所以得把申请的这两个账号的私钥导入到cleos创建的钱包里面
shaokun11121
Private key: 5KFoeWx69fjPj7mTDbcD9JauYd9LLjikYTa9Qg7N5CVZTqZrzNG
Public key: EOS69w5V46oUaBD5PSx3AMRxWXPi6b3St2PwbX9kBPY6tZvSs65o1

shaokun11122
Private key: 5HrJQ9eepF6FuG47eSJprxoFQ6PWRkombbWEwxoSQr6FJ1wQPbg
Public key: EOS8ZZCicammR45b9tQUSU8VHqX4M8oFM89Cs8tFFWYgUGasegnnV
以太坊权限的实现
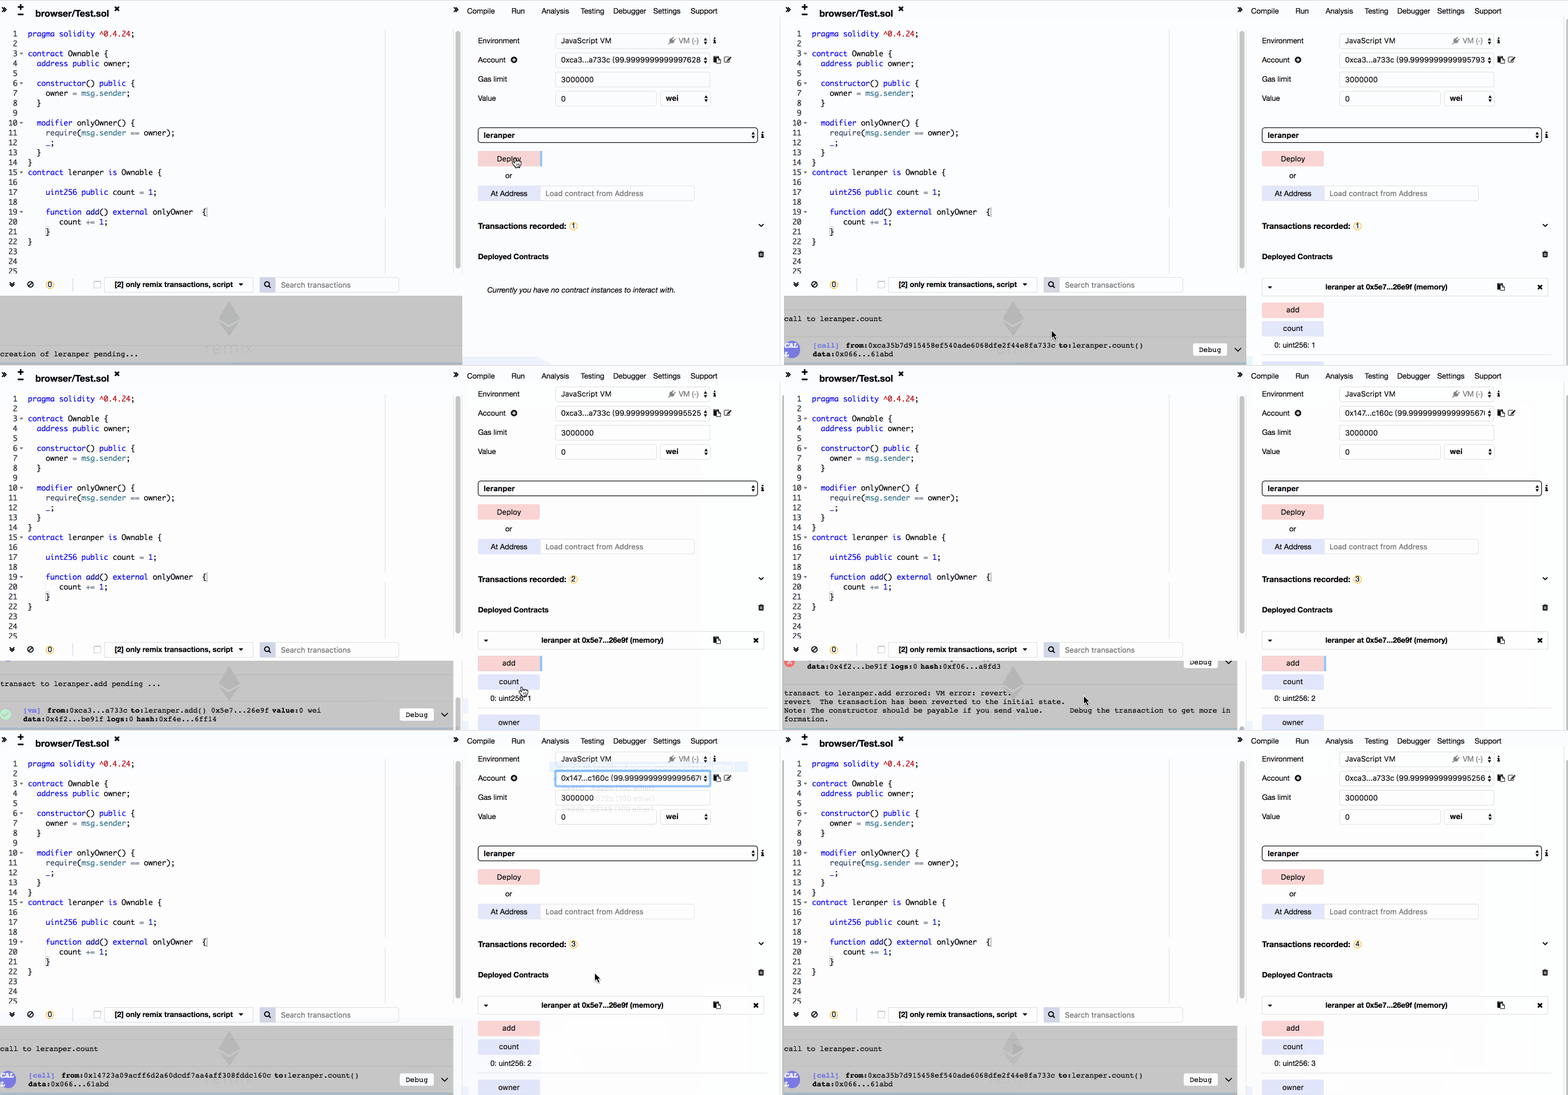
这里先给贴一段简单的以太坊的权限的管理吧,这个要自己来写,如果你有以太坊的经验,相信更加容易理解.
理一理:
- 部署合约,部署完成后,owner就是部署者的地址
- 查看count的值,此时count为初始值1
- 执行add方法
- 查看count的值,此时count的值为2
- 切换address
- 执行add方法,报错,因为不是owner
- 查看count的值 还是为2
- 再次执行3,4步骤,此时count的值的值为3

pragma solidity ^0.4.24;

contract Ownable {
  address public owner;

  constructor() public {
    owner = msg.sender;
  }

  modifier onlyOwner() {
    require(msg.sender == owner);
    _;
  }
}
contract leranper is Ownable {

    uint256 public count = 1;

    function add() external onlyOwner  {
       count += 1;
    }
}
eos的权限的实现
eos的权限不需要写到合约中,底层已经帮我们实现了,我们只需要进行相应的设置即可,以下是设置权限的签名.至于设置的各个参数怎么设置,怎么用,可以看看官方文档吧
Usage: cleos set account permission [OPTIONS] account permission authority [parent]

Positionals:
  account TEXT                The account to set/delete a permission authority for (required)
  permission TEXT             The permission name to set/delete an authority for (required)
  authority TEXT              [delete] NULL, [create/update] public key, JSON string, or filename defining the authority (required)
  parent TEXT                 [create] The permission name of this parents permission (Defaults to: "Active")
方法1:使用account设置
cleos set account permission shaokun11121 add '{"threshold":1,"keys":[],"accounts":[{"permission":{"actor":"shaokun11122","permission":"active"},"weight":1}]}'
方法二:使用public key进行设置
cleos set account permission shaokun11121 add '{"threshold":1,"keys":[{"permission":{"key":"EOS8ZZCicammR45b9tQUSU8VHqX4M8oFM89Cs8tFFWYgUGasegnnV","permission":"active"},"weight":1}]}'
当然你可以把两种设置方式都用上,根据个人习惯设定就好,
这里建议后面的permission这段,先使用ide写上正确的json格式.然后在json格式压缩进行压缩成一行,这样可以避免不必要的麻烦
    {
    "threshold": 1,
    "keys": [],
    "accounts": [
        {
            "permission": {
                "actor": "kun2",
                "permission": "active"
            },
            "weight": 1
        }
    ]
}
eos的权限的解读
- 当按照上述方式设置好后,可以通过此命令查看设置的权限,注意看这里permissions里多了一个add权限 这个权限的名字是 add,阀值是1 权限值 是1 ,父权限是active.
- 这样设置后,也就是说 只要是active shaokun11121的active的权限能够执行的操作,使用shaokun11122的密钥生成的账户的active权限均能做
- 一个私钥与一个公钥是一一对应,而这一对钥匙可以作为一个或者多个account中的权限级别
当然你也可以按照上述的方式多设置几个权限看看,它的形式就像Windows的目录展示的形式,很好辨认的
cleos -u http://jungle.cryptolions.io:18888 get account shaokun11121
查看的结果
bogon:libraries shaokun$ cleos -u http://jungle.cryptolions.io:18888  get account shaokun11121
created: 2018-11-17T12:46:30.000
permissions:
     owner     1:    1 EOS69w5V46oUaBD5PSx3AMRxWXPi6b3St2PwbX9kBPY6tZvSs65o1
        active     1:    1 EOS69w5V46oUaBD5PSx3AMRxWXPi6b3St2PwbX9kBPY6tZvSs65o1
           add     1:    1 shaokun11122@active
memory:
     quota:     260.1 KiB    used:     95.82 KiB

net bandwidth:
     staked:        100.0000 EOS           (total stake delegated from account to self)
     delegated:       0.0000 EOS           (total staked delegated to account from others)
     used:             5.534 KiB
     available:        18.23 MiB
     limit:            18.24 MiB

cpu bandwidth:
     staked:        100.0000 EOS           (total stake delegated from account to self)
     delegated:       0.0000 EOS           (total staked delegated to account from others)
     used:             9.367 ms
     available:        3.629 sec
     limit:            3.639 sec

EOS balances:
     liquid:           80.1129 EOS
     staked:          200.0000 EOS
     unstaking:         0.0000 EOS
     total:           280.1129 EOS

producers:     <not voted>
eos权限的使用
上述方法给shaokun11121设置了一个add的权限,得添加到具体的action上才能体现出这个价值.目前能够搜到的文章都是加载 transfer这个操作上面的.为什么呢? 因为有了这个权,就可以不用登陆shaokun11121转账了,直接使用shaokun11122转账了.
权限签名
Positionals:
  account TEXT                The account to set/delete a permission authority for (required)
  code TEXT                   The account that owns the code for the action (required)
  type TEXT                   the type of the action (required)
  requirement TEXT            [delete] NULL, [set/update] The permission name require for executing the given action (required)
给shaokun11121 add action和add 权限关联起来,这样只要是shaokun111121的合约中有add action,那么使用shaokun11122的add权限均可以调用.根据我的测试,一个account目前只能部署一个智能合约,所以这个add方法是唯一的
cleos -u http://jungle.cryptolions.io:18888 set action permission shaokun11121 shaokun11121 add add
eos权限合约的编写
合约编写很简单,就是helloworld,注意其中的权限验证那一行,也就是说,只有自己的account 才能添加或者更新自己的这条信息
#include <eosiolib/eosio.hpp>

using namespace eosio;

class [[eosio::contract]] learnper2 : public contract {
  public:
    using contract::contract;
    learnper2(eosio::name reciever,eosio::name code,eosio::datastream<const char*> ds )
                              :contract(reciever,code,ds),
                              _students(reciever,code.value){};

    [[eosio::action]]
    void add(name user, const std::string msg) {
      require_auth(user); // 权限额验证
      auto itr = _students.find(user.value);
      if (itr == _students.end()){
        _students.emplace(get_self(),[&](auto& row){
          row.user = user;
          row.msg = msg;
        });
      } else {
        _students.modify(itr, get_self(), [&](auto& row){
          row.msg = msg;
        });
      }
    };


  private:
  struct [[eosio::table]] student
  {
    name user;
    std::string msg = "hello world";
    uint64_t primary_key() const {return user.value;};

  };
  typedef eosio::multi_index<"student"_n, student> student_index;
  student_index _students;
};
EOSIO_DISPATCH( learnper2, (add))
eos权限合约的编译,部署
编译:这里有个小插曲,放合约cpp文件的文件夹貌似必须命名和主合约的文件名一致,生成的abi里面没有内容,这着实也困扰了我一会
eosio-cpp -abigen learnper2.cpp learnper2.wasm
这里部署合约一般需要购买ram
cleos -u http://jungle.cryptolions.io:18888 system buyram shaokun11121 shaokun11121 -k 256部署:
cleos -u http://jungle.cryptolions.io:18888 set contract shaokun11121 ./learnper2/ -p shaokun11121@active
eos权限合约结果展示

这里说一下我的操作流程
- 调用合约的add action 插入一条信息(我这里之前插入信息,故此步未进行演示)
- 首先查看了 shaokun11121的 account信息,可以看到添加了一条add的permission
- 再次查看了 shaokun11122的account信息,正常状态,只要你新建一个account都是这样的
- 查看了钱包里面的信息,这里显示的是shaokun11122的公钥(大家可以仔细对比一下)
- 查看链上table的数据
修改数据,我们仔细来分析这条命令
- 这里使用的传入的user是shaokun11121
- 传入的permission是 shaokun111121的add这个permission,各位同学可以回想一下之前的合约,调用都是是用的active
- 钱包中并没有shaokun11121的私钥
- 钱包中占有shaokun11122的私钥
再次展示数据,数据修改成功
cleos -u http://jungle.cryptolions.io:18888 push action shaokun11121 add '{"user":"shaokun11121","msg":"i am shaokun"}' -p shaokun11121@add
eos权限使用心得
- 这里只是展示的单个权限的使用在dapp中怎么使用
- 如果只看白皮书还是很难理解的,建议通过实际的操作,加深理解吧
eos权限的进一步思考
- 以太坊和eos的多重权限的签名目前我还没遇到过在dapp中实际使用的例子,官方的例子就是基本上是转账需要多个人同意,那么在dapp中如何使用呢?
- 本课程只展示了阀值为1,权限值为1的active权限,那么如果按照官方例子,如果阈值为2,同时需要两个权限值都为1的账号的active权限来进行某个action的执行呢?
- 接上一条,如果需要的不是active权限,比如本课中的add权限呢?
关于我
区块链技术痴迷的程序猿一枚,如果你喜欢我的文章,可以加上微信共同学习,共同进步。